User Manual · Precision Screen Metrology · Updated November 2026

How to Use Online Ruler Plus

Online Ruler Plus is a client-side physical measurement workspace that converts your screen into a 1:1 calibrated ruler. Follow these steps to calibrate once and measure in centimeters, millimeters, and 1/16″ inches.

1Step 01 · Calibration

How do you calibrate your screen density first?

Screen density calibration is the essential first step that replaces your browser’s 96 CSS PPI default with your display’s true millimeter pixel pitch. Scroll to the Calibrate Your Screen section on any ruler page and choose your preferred reference method: hold a standard ISO/IEC 7810 ID-1 payment or ID card (85.60 × 53.98 mm) flat against the screen and adjust the slider or arrow keys until the box matches your card width; enter your display panel’s visible diagonal in inches (such as 14, 15.6, 24, or 27 inches) at 100% browser zoom; or run Auto-Detect Device. Click Apply Calibration to save the profile locally in your browser.
2Step 02 · Units & Edges

How do you choose measurement units and active edges?

Unit and edge configuration is controlled via the segmented instrument pods at the top of the workspace or via single-key shortcuts. Select your linear unit: press key 1 for Centimeters (cm) with 0.5 cm and 1 mm subdivisions, key 2 for Inches (in) with 1/2, 1/4, 1/8, and 1/16 inch dyadic fractions, key 3 for W3C CSS Pixels (px), or key 4 / M for Millimeters (mm). You can also enable Dual cm/in mode to display metric and imperial graduations side by side. Toggle Top, Bottom, Left, Right, or All Edges depending on where you want to hold your object against the screen.

3Step 03 · Alignment & Guides

How do you align at zero and measure spans with guides?

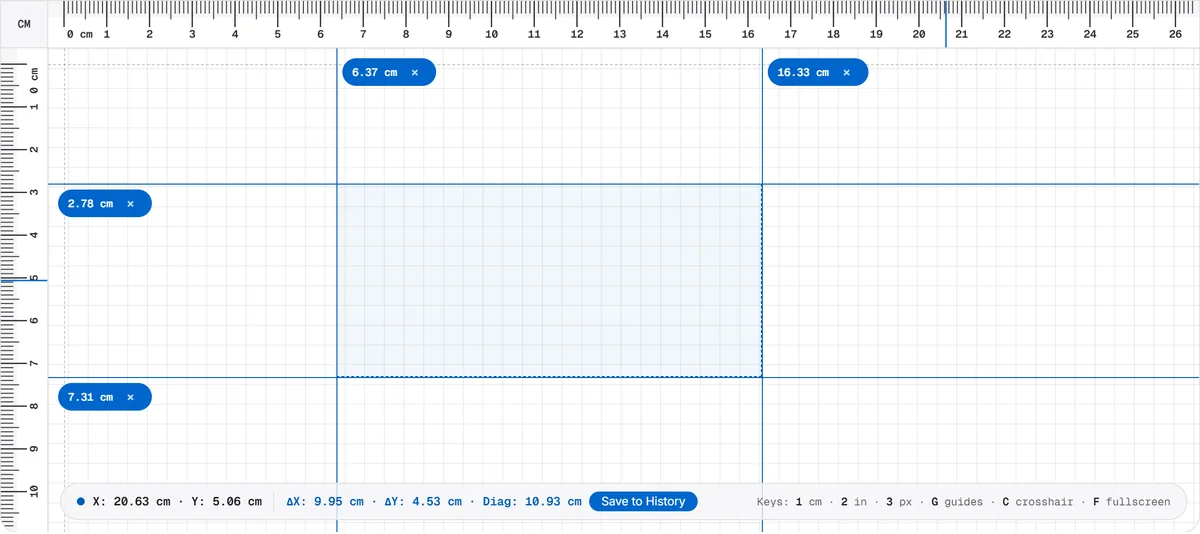
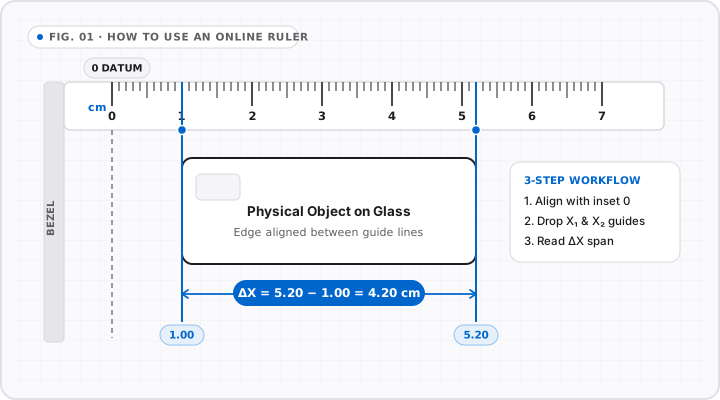
Zero-datum alignment means placing the starting edge of your physical object directly over the 0 graduation line inside the ruler strip (inset 16 CSS pixels from the bezel corner) rather than pressing against a raised plastic monitor bezel. Align the left or top end of your item with the 0 dashed datum hairline, then click any ruler strip or inside the gridded stage to drop a draggable blue guide line at the opposite end of your object. When two parallel guides are placed on screen, Online Ruler Plus computes the exact point-to-point delta span (ΔX or ΔY) and lets you save it to Measurement History.

Overlay Instruments · Floating Ruler & Protractor

How do you use the floating ruler and 180° angle protractor?

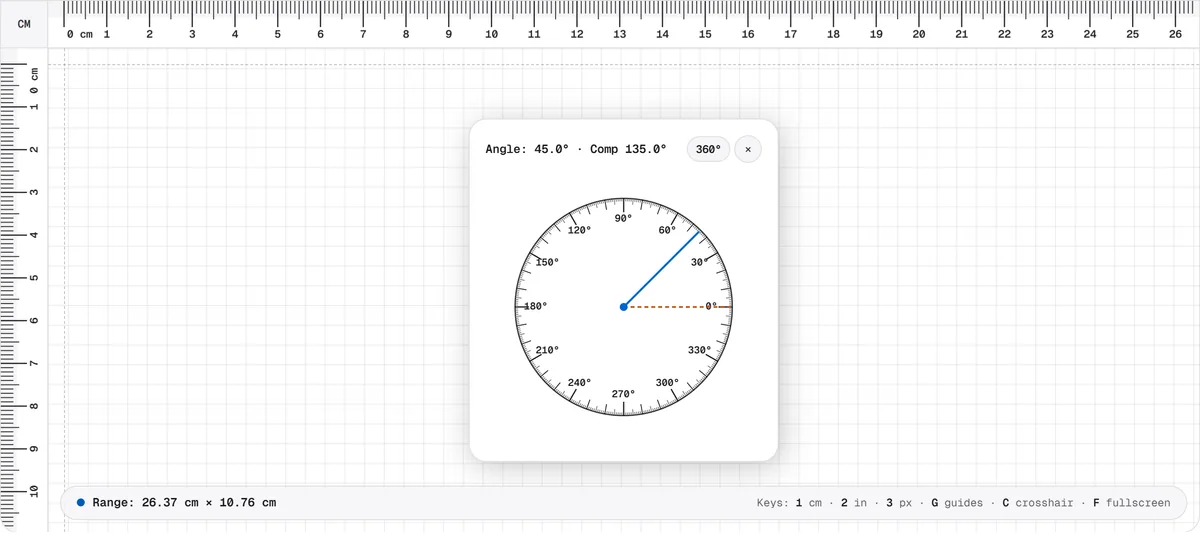
Interactive overlay instruments let you measure diagonal features and angles directly inside the workspace without rotating your laptop or physical item. Click the + Floating Ruler button in the toolbar to spawn a movable, 360-degree rotatable ruler bar that you can drag over any region of the stage and fine-tune by angle handle. Press keyboard shortcut P (or click Protractor) to activate the 180-degree optical angle protractor overlay. Drag the protractor vertex onto the corner of your part and align the adjustable ray arm to inspect bevels or corners from 0° to 180° in 0.1° increments. Press C to toggle the cursor-following crosshair or Esc to clear active guides.

Printable Actual-Size Ruler · 100% Scale Check

How do you print an actual-size ruler at 100% scale?

Printing an actual-size ruler requires disabling automatic page scaling in your browser print dialog so your printer preserves true physical dimensions. According to ISO 216 (A4: 210 × 297 mm) and ANSI Letter (8.5 × 11.0 in / 215.9 × 279.4 mm) paper geometry, default settings like Fit to Printable Area or Shrink to Fit reduce printed scales by roughly 3% to 8%. When printing Online Ruler Plus (via Ctrl+P on Windows/Linux or Cmd+P on macOS), open More Settings, set Scale to Actual Size or Custom 100%, choose Default or None margins, and verify your printout against an 85.60 mm ISO/IEC 7810 ID-1 bank card before measuring materials.

Practical Field Workflows · Hardware, Crafts & Document Layout

Step-by-Step Recipes for Common Measurement Tasks

Different physical items create distinct alignment challenges—curved coins roll, short threaded screws sit awkwardly against corners, and long prints exceed narrow viewports. Use these verified workflows to keep readings repeatable and gentle on your display glass.

Recipe 01 · Circular Parts, Coins & Jewelry

Measuring outer diameter with tangent vertical guides

Trying to line a round coin, washer, O-ring, or ring shank up with tick zero often hides the outer curve behind glare. Instead, lay the circular object near the center of the light gridded stage—or over a thin transparent protective sheet if the ring has sharp metal prongs. Click anywhere along the top ruler strip to drop Guide 1 and nudge it until the vertical hairline kisses the left tangent of the circle. Click again to drop Guide 2 on the right tangent. Online Ruler Plus automatically calculates ΔX (Right minus Left) in millimeters, centimeters, or decimal/fractional inches without requiring zero alignment.

Recipe 02 · Screws, Bolts & Watch Lugs

Measuring metric thread length and watch strap width

For small hardware fasteners (M2 through M10 machine screws, PCB standoffs, or watch spring-bar lugs between 18 mm and 24 mm), switch to the Millimeter Ruler (mm) where every 1 mm division is marked clearly. Rest a piece of sticky note or clear acetate film over the glass so sharp threads never scratch anti-reflective coatings. Align the underside of a flat-head fastener (or overall head-to-tip height for countersunk screws) against Guide 1, then drag Guide 2 to the thread tip. Cross-check pitch count across 10 mm to avoid mistaking an M3-0.5 bolt for a #4-40 imperial fastener.

Recipe 03 · Woodworking, Crafts & 1/16″ Fractions

Reading reduced 1/16″ imperial fractions reliably

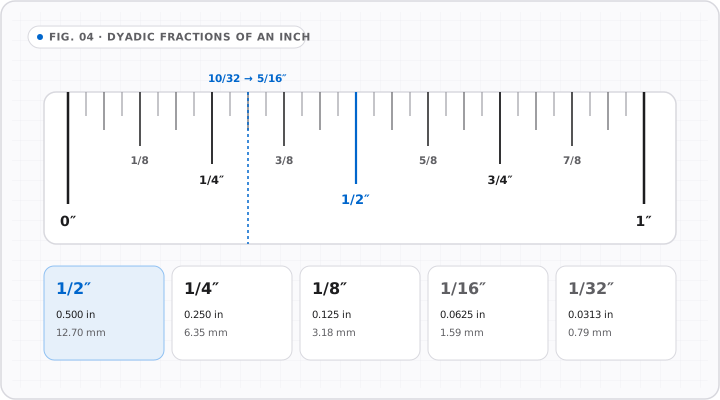
When working with U.S. quilting templates, brass fittings, paper stock, or carpentry sketches, switch to the Inch Ruler (1/16″). Each 25.4 mm inch block is divided into four visual tick tiers: half-inch (1/2″), quarter-inch (1/4″ and 3/4″), odd eighths (1/8″, 3/8″, 5/8″, 7/8″), and shortest sixteenth marks. Moving your cursor or dragging a guide line displays the nearest reduced fraction automatically alongside decimal inches, eliminating mental counting errors such as reading 5/8″ as 10/16″ or confusing 9/16″ with 1/2″.

Recipe 04 · Upright Objects & Tall Smartphones

Using vertical edges and stepping spans longer than your screen

When checking the standing height of bottles, keycaps, display stand risers, or vertical card proportions, open the Vertical Ruler with Left and Right edge strips active. Press F to enter Fullscreen mode so browser tabs and bookmarks no longer shorten your usable vertical axis. If an object—such as a 35 cm binder or poster margin—is slightly wider than your display, align the start with zero, apply a small piece of low-tack painter’s tape on the object precisely opposite a whole graduation like 25.0 cm, reposition that tape mark back onto 0, and add the second partial span.

Workspace Controls · Keyboard Reference

Complete Keyboard Shortcut Table

Keeping one hand on the physical object you are holding near the screen while switching units or spawning guides with single keystrokes avoids nudging your measurement out of alignment.

Shortcut KeyWorkspace ActionWhen to Use
1Switch to Centimeters (cm)Everyday lengths with 1 mm minor ticks and 0.5 cm midpoints
2Switch to Fractional Inches (in)US sizing, woodworking, fabric cuts, and 1/16″ fraction readouts
3Switch to CSS Pixels (px)UI alignment, responsive breakpoints, and viewport width checks
4 / MSwitch to Millimeters (mm)M2–M10 bolts, jewelry rings, watch lugs, and fine gaps
DToggle Light / Dark ThemeReduce screen glare or match ambient room lighting while measuring
GAdd Vertical / Horizontal GuideDrop draggable boundary lines for ΔX / ΔY subtraction
CToggle Crosshair OverlayTrack live cursor X/Y coordinates across the canvas stage
PToggle 180° Angle ProtractorMeasure corners, chamfers, and slopes to 0.1° resolution
FEnter / Exit FullscreenMaximize measurable physical span across edge-to-edge glass
EscClear Active Guides & ModalsReset guide pairs rapidly before measuring the next object

Pre-Measurement Verification · 6-Point Checklist

Six Checks Before Trusting a Critical Reading

Before recording measurements for custom foam inserts, 3D-printed brackets, framing mats, or replacement fasteners, run through this quick six-point verification routine to rule out common visual and OS traps:

  • 1. Check the Active Scale badge: Confirm it displays Calibrated (card) or Calibrated (diagonal) rather than uncalibrated 96 PPI Estimate.
  • 2. Verify 100% browser zoom during diagonal setup: Press Ctrl+0 or Cmd+0 before typing monitor inches; zoom freely afterward—calibrated devicePxPerMm compensates automatically.
  • 3. Confirm secondary monitor profile: Moving a browser window from a laptop screen to an external desktop monitor changes physical PPI; re-verify against an ID-1 bank card (85.60 mm) or coin if switched displays.
  • 4. Look squarely perpendicular to each tick: Cover glass on laptops, tablets, and phones creates a 0.3–1.0 mm visual offset if read sideways. Line your eye directly over each guide line.
  • 5. Respect bezel thickness at zero: Never jam hard parts into raised plastic edges; use either the inset 0 datum dashed hairline or two interior guide lines (ΔX / ΔY).
  • 6. Guard panel glass against scratches: Place thin film, paper, or clear tape under sharp steel calipers, threaded tips, or rough ceramics. Use certified vernier calipers for sub-0.2 mm tolerances.

Visual Measurement Field Guide

Diagrams, Live Motion & Workspace Captures

Every core concept illustrated clearly so you can calibrate once, align accurately, and measure with confidence.

See Every Measurement Mechanics in Motion

Motion playing
0123453.00 cm0.1 cm = 1 mm · 10 mm = 1 cm

Major centimeter divisions subdivide cleanly into 5 mm half-marks and 1 mm fine graduations.

1 cm = 10 mm

How to Use an Online Ruler

FIG. 01 · WORKFLOW
Technical diagram showing inset zero datum away from the bezel, an object placed against the screen, and ΔX subtraction between X1 and X2 guides.
Align objects with the inset 0 datum—never the outer bezel—or subtract X1 from X2 anywhere along the stage.

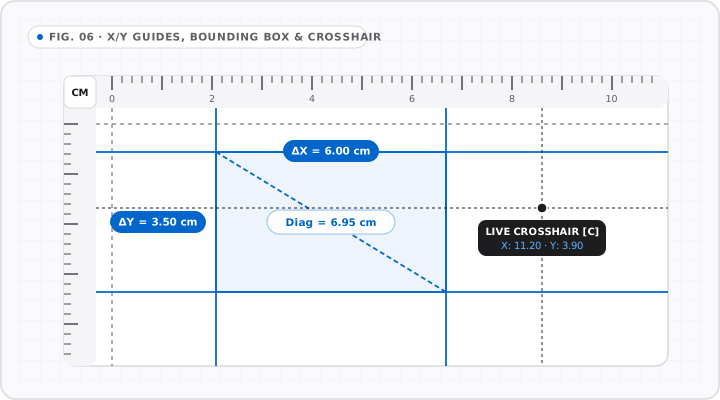
X/Y Guides & Crosshair Measurement

FIG. 06 · 2D STAGE
Workspace blueprint showing paired X and Y draggable guide lines forming a shaded ΔX by ΔY rectangle, diagonal span, and live crosshair badge.
Combine vertical X guides, horizontal Y guides, and live cursor crosshairs to capture rectangular and diagonal spans in one pass.

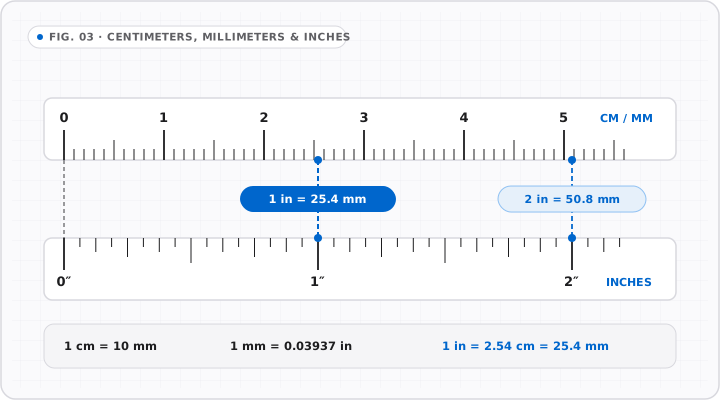
Centimeters, Millimeters & Inches

FIG. 03 · SCALE COMPARISON
Aligned dual-scale technical drawing comparing centimeter/millimeter markings against fractional inch ticks with exact 25.4 mm conversion.
Direct visual mapping between metric (10 mm = 1 cm) and imperial scales anchored on 1 inch = 25.40 mm exact.

Fractions of an Inch

FIG. 04 · SUBDIVISIONS
Hierarchical binary fraction diagram from whole inch to halves, quarters, eighths, sixteenths, and thirty-seconds with decimal equivalents.
Every halving step increases tick precision and doubles denominator resolution from 1/2" (0.500") down to 1/32" (0.0313").

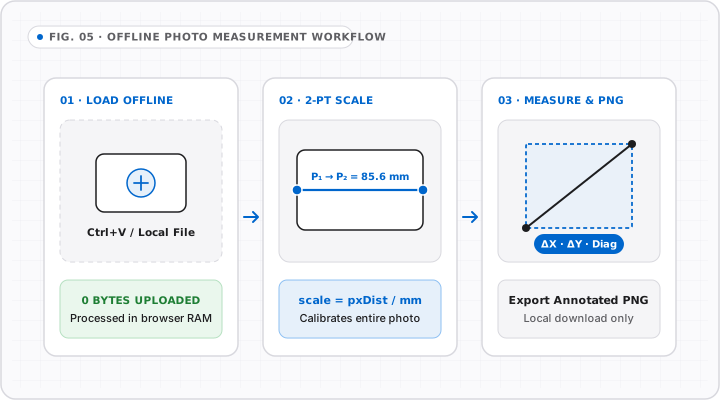
Measuring Objects Using Photo Measurement

FIG. 05 · PHOTO MODE
Three-step diagram illustrating local photo upload, 2-point reference calibration on a known object, and true-scale measurement on target geometry.
Photo Mode runs 100% locally in your browser: define a 2-point reference span first, then measure any edge or box on the same plane.

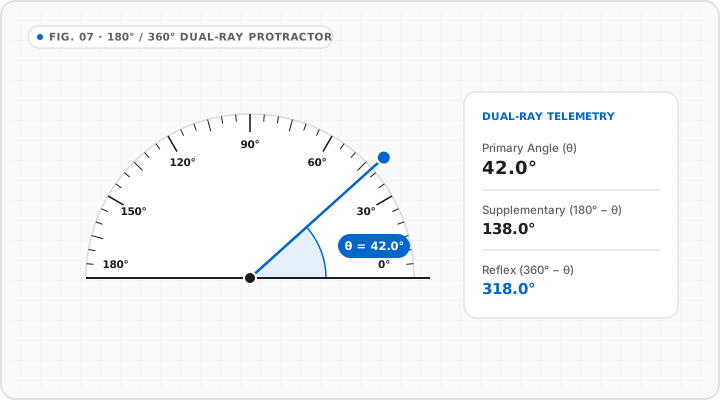
Protractor & Angle Measurement

FIG. 07 · ANGLES
Dual-ray protractor diagram reading a 42.0 degree primary angle alongside 138.0 degree supplementary and 318.0 degree reflex readouts.
Measure acute, obtuse, and 360° reflex angles with live supplementary and inverse telemetry anchored at any movable vertex.

Precision X/Y Guide Box & Crosshair Readout

LIVE UI · X/Y GUIDES
Captured workspace view showing vertical and horizontal blue guide lines isolating a rectangular span with live ΔX, ΔY, and diagonal readout.
Draggable X and Y guides lock rectangular spans directly onto the calibrated canvas with instant diagonal calculation.

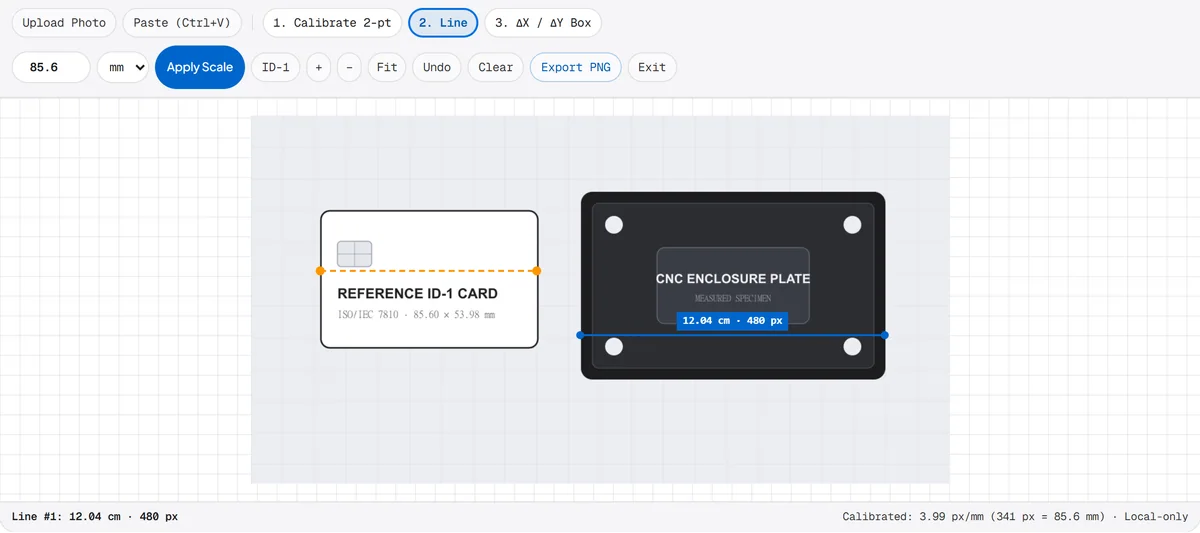
Two-Point Reference Calibration on Local Photos

LIVE UI · PHOTO MODE
Photo measurement interface showing an orange reference calibration line across a card and a blue 12.04 cm measurement line across a metal plate.
Calibrate from an ID-1 card or known dimension inside any photo and measure parts privately without uploading files.

Transparent 360° Protractor Overlay

LIVE UI · 360° PROTRACTOR
Screen ruler workspace displaying the interactive transparent 360 degree circular protractor dial set to 45.0 degrees.
Overlay the interactive 360° dial directly on top of diagrams, schematics, or pasted screenshots.